Understanding Epoxy Flooring for Tiles
What is Epoxy Flooring?
Epoxy flooring isn’t just a fancy term tossed around by interior decorators; it’s a game-changer for anyone tired of dull, stained surfaces. Imagine a surface so resilient that it laughs in the face of spills, scratches, and even the occasional dropped tool. That’s epoxy flooring for you! It’s a polymer resin that, when applied over your existing floor tiles, transforms the entire space into a sleek, durable wonderland. But here’s the kicker—many ask, floor tiles me epoxy kaise lagaye without realising that mastering this craft requires more than just smearing on a shiny coat.
Understanding epoxy flooring begins with recognising its superpowers: unparalleled adhesion, chemical resistance, and a glossy finish that can make even the most mundane floor look runway-ready. The process involves a meticulous preparation of the surface, ensuring that your tiles are clean, dry, and free of any grease or dust. Then, the epoxy mixture is carefully spread and rolled out in even layers. For those wondering, floor tiles me epoxy kaise lagaye isn’t as simple as pouring paint—it’s a craft that demands precision and patience.
In essence, epoxy flooring elevates your space from ordinary to extraordinary. Whether you’re revamping a garage, kitchen, or commercial space, knowing the ins and outs of how to apply epoxy over tiles might just be your secret weapon for a stunning, long-lasting finish. So, if you’re contemplating floor tiles me epoxy kaise lagaye, remember: it’s both an art and a science, blending durability with a dash of style. And trust me, once done right, your floors will thank you with a radiant shine that endures through the ages.
Benefits of Using Epoxy on Floor Tiles
Epoxy flooring isn’t just a surface treatment; it’s a revolution in durability and style. When applied over tiles, it transforms an ordinary floor into a resilient masterpiece, capable of withstanding the chaos of daily life. The benefits of using epoxy on floor tiles are manifold—chemical resistance and a seamless finish that’s both easy to clean and visually striking. For those pondering, floor tiles me epoxy kaise lagaye, understanding the core advantages can make all the difference in achieving a perfect, professional look.
One of the most compelling reasons to opt for epoxy on your tiled floors is its ability to create a glossy, high-end appearance that elevates the space effortlessly. Moreover, epoxy’s adhesive properties ensure it bonds tightly with the existing tiles, preventing peeling or cracking over time. The process also offers a level of customisation—think colour, texture, and finish—that can turn your flooring into a true statement piece. Whether it’s a garage, workshop, or even a kitchen, this coating provides a formidable barrier against stains, spills, and wear and tear.
For those curious about the practical benefits, here’s a quick rundown:
- Enhanced durability, resisting scratches and stains
- Ease of maintenance with a smooth, washable surface
- Cost-effective alternative to replacement or extensive repairs
Remember, mastering the art of applying epoxy on floor tiles is not merely about aesthetics; it’s about ensuring longevity and functionality. If you’re asking, floor tiles me epoxy kaise lagaye, then grasping these core benefits will undoubtedly arm you with the confidence to proceed with finesse and precision.
Types of Epoxy Suitable for Floor Tiles
Understanding epoxy flooring for tiles requires a close look at the variety of epoxy resins suited for different surfaces. Not all epoxies are created equal; selecting the right type can make the difference between a flawless finish and a costly mistake. When considering floor tiles me epoxy kaise lagaye, it’s essential to understand the specific epoxy formulations designed for ceramic, porcelain, or natural stone tiles. These formulations are tailored to bond effectively without damaging delicate surfaces, ensuring a resilient, long-lasting coating.
Among the most suitable options are **self-priming epoxy coatings** that adhere seamlessly to existing tiles, providing a glossy, durable surface. These epoxies typically have excellent chemical resistance and flexibility, making them ideal for environments exposed to moisture or heavy usage. For more specialised needs, such as high-traffic commercial spaces, epoxy systems with enhanced abrasion resistance are available. They not only improve the appearance but also extend the lifespan of the tiled surface.
- Epoxy with high adhesion properties
- Flexible epoxy formulations for reinforced durability
- Resistant to stains, spills, and wear
Choosing the right epoxy for floor tiles involves understanding these variations and matching them to your specific needs. When you ask, floor tiles me epoxy kaise lagaye, recognising the compatibility of epoxy types with your tiles ensures a professional, lasting finish that elevates your space’s aesthetic and functional appeal.
Preparing Your Floor Tiles for Epoxy Application
Cleaning and Degreasing the Surface
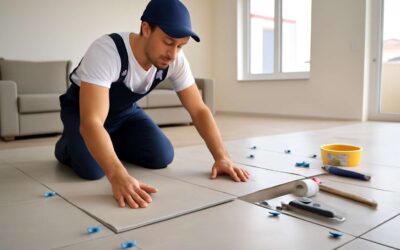
When considering **floor tiles me epoxy kaise lagaye**, the first step is to ensure the surface is impeccably prepared. A clean, degreased floor sets the foundation for a durable and flawless epoxy coating. Dust, grease, and any lingering dirt can compromise the adhesion, leading to unsightly bubbles or peeling over time. I’ve seen many projects falter simply because this crucial step was rushed or overlooked.
To achieve optimal results, thoroughly clean the floor with a suitable degreasing agent. Use a stiff brush or mop to remove stubborn stains and oil patches. Once cleaned, rinse the surface with water and allow it to dry completely—this prevents trapped moisture from affecting the epoxy’s bond. For extra assurance, some professionals recommend sanding the tiles lightly, which enhances grip and ensures better epoxy adhesion. Remember, meticulous preparation is the cornerstone of **floor tiles me epoxy kaise lagaye** successfully, making your investment last for years to come.
Removing Old Coatings or Residues
Old coatings and residues can sabotage your epoxy job. If not properly removed, they create a barrier that hampers adhesion. The key to a successful epoxy application in **floor tiles me epoxy kaise lagaye** is thorough surface preparation. First, identify any existing paint, varnish, or glue that might be present. These must be stripped away completely to prevent future peeling or bubbling.
Use a suitable chemical remover or scraper to gently lift off stubborn residues. For residual adhesive or paint, a wire brush or coarse sandpaper can be highly effective. In some cases, a light sanding of the entire surface is recommended — this not only removes remaining residues but also roughens the surface, which enhances epoxy grip. Remember, a clean and residue-free surface is the foundation of durable epoxy flooring.
Careful removal of old coatings isn’t just about aesthetics; it’s about ensuring the longevity of your epoxy layer. Proper preparation makes all the difference in **floor tiles me epoxy kaise lagaye**. Skipping this step risks future repair costs and compromised durability. Take your time, and your investment will stand the test of time!
Repairing Damaged Tiles Before Epoxy Application
Before diving into the application of epoxy on your floor tiles, it’s crucial to address any existing damage. Cracks, chips, or uneven surfaces can undermine the entire project. Repairing damaged tiles isn’t just about aesthetics; it’s about creating a robust foundation for the epoxy layer to bond seamlessly. Carefully inspect each tile, and if you notice any compromised areas, take swift action.
Start by removing loose fragments and filling cracks with a high-quality tile filler. Once dry, gently sand the repaired areas to ensure they blend smoothly with the surrounding surface. For more extensive damage, consider replacing the affected tiles entirely—this guarantees a uniform, durable finish. Remember, a well-prepared surface is the secret to achieving a flawless epoxy finish when learning **floor tiles me epoxy kaise lagaye**.
- Inspect tiles for cracks or chips
- Remove loose fragments and fill cracks with tile filler
- Smoothen repairs with light sanding
By investing time in repairing damaged tiles beforehand, you not only prolong the lifespan of your epoxy coating but also ensure a sleek, professional look. Skipping these steps risks future peeling or bubbling, which can turn your seemingly simple project into a costly headache. The key to success in **floor tiles me epoxy kaise lagaye** lies in meticulous preparation—because the foundation truly makes all the difference.
Ensuring Proper Surface Dryness
Ensuring your floor tiles are properly prepared before applying epoxy is a critical step that many overlook. One often underestimated factor is surface dryness. Moisture trapped beneath the tile surface can cause epoxy to fail prematurely, leading to peeling or bubbling. It’s essential to let the surface dry thoroughly—preferably for at least 24 hours—before starting the epoxy process.
There are a few simple checks to confirm the floor’s readiness. Lightly press a piece of absorbent cloth on the tile surface; if it soaks up moisture, the surface isn’t dry enough. Additionally, inspecting the floor for any residual dampness or condensation is vital. If you want a smooth, long-lasting finish, patience here pays off!
- Ensure no water or moisture remains on the tiles
- Use a fan or dehumidifier to speed up drying if necessary
- Check for any signs of dampness before proceeding
Remember, proper surface dryness is the foundation of successful epoxy application. When learning how to apply epoxy on floor tiles, this simple step can make all the difference in achieving a flawless finish—because in the world of flooring, patience and preparation are everything!
Gathering Necessary Materials and Tools
Essential Materials for Epoxy Application
Embarking on the journey of transforming your space with epoxy requires more than just desire — it demands precise preparation. Before you delve into the intricate art of floor tiles me epoxy kaise lagaye, gathering the necessary materials and tools becomes a vital step. A well-equipped workspace not only streamlines the process but also ensures a flawless finish that endures the test of time.
Essential materials for epoxy application include high-quality epoxy resin, suitable hardeners, and a reliable primer to guarantee adhesion. Equally important are protective gear such as gloves and respirators, which safeguard you during the mixing and application phases. To make the process seamless, consider assembling the following:
- Epoxy resin and hardener
- Surface primer
- Mixing buckets and stir sticks
- Degreasing agents and cleaning supplies
- Trowels, rollers, or brushes for even application
- Masking tapes and protective coverings
Having these materials at hand transforms a potentially daunting task into a meticulous craft, allowing you to achieve that glossy, durable finish with confidence. Mastery in floor tiles me epoxy kaise lagaye begins with the right tools and a keen eye for detail — every element contributing to the elegance you envision for your space.
Tools Required for Applying Epoxy
Embarking on the journey of floor tiles me epoxy kaise lagaye requires more than just enthusiasm — it demands the right tools and materials. Proper preparation ensures a smooth application and a flawless, long-lasting finish. Without the right equipment, even the best epoxy can fall short of expectations.
To start, gather high-quality epoxy resin and the compatible hardener. These are the backbone of a durable epoxy coating. A reliable surface primer is equally essential for optimal adhesion. Safety should never be overlooked; protective gloves, respirators, and eye protection are must-haves during mixing and application.
For the actual process, you will need:
- Mixing buckets and stir sticks for thorough blending
- Degreasing agents and cleaning supplies to prepare the surface
- Trowels, rollers, or brushes to ensure an even spread
- Masking tapes and protective coverings to safeguard surrounding areas
Having these materials ready transforms what might seem a complex task into a manageable project. Perfecting floor tiles me epoxy kaise lagaye hinges on careful selection of tools and meticulous preparation — every element plays a role in achieving that sleek, durable finish.
Safety Equipment to Use During Application
In the shadowed silence of a workshop, where every surface whispers tales of transformation, gathering the necessary materials for epoxy application becomes an act of reverence. The right tools and safety equipment are not mere accessories but vital guardians in the quest to master floor tiles me epoxy kaise lagaye. Without them, even the most skilled craftsman risks succumbing to the chaos of oversight.
Start by assembling high-quality epoxy resin and its compatible hardener, the twin pillars of a resilient coating. Precision is key, so ensure all tools—mixing buckets, stir sticks, and application brushes—are meticulously prepared. Safety, often overlooked, should be at the forefront; gloves, respirators, and eye protection are essential shields against the potent fumes and chemical splashes that lurk in the process.
To keep hazards at bay, a simple list suffices:
- Protective gloves and respirators
- Eye protection, such as goggles
- Masking tapes and protective coverings for surrounding areas
Every element, from the selection of materials to the safeguarding of oneself, weaves into the dark poetry of transforming mundane floor tiles into a masterpiece of epoxy artistry. Mastery of floor tiles me epoxy kaise lagaye demands not only technique but a vigilant eye towards safety in the shadows of this craft.
Step-by-Step Guide to Lagae Epoxy on Floor Tiles
Surface Preparation Checklist
Embarking on the journey of applying epoxy on floor tiles is akin to entering a world where durability meets brilliance. To ensure a flawless finish, meticulous surface preparation is crucial. The first step is to create a surface that is free from dust, grease, and loose particles. This not only enhances adhesion but also guarantees a long-lasting epoxy coating. A well-prepared surface acts as the foundation for your epoxy masterpiece, making the entire process smoother and more rewarding.
Before you begin, it’s wise to follow a detailed preparation checklist. Start by thoroughly cleaning the floor tiles with a high-quality degreasing agent. Next, inspect for any cracks or damaged tiles, repairing them promptly to prevent future issues. Once repairs are complete, ensure the surface is completely dry—moisture can undermine the epoxy’s bond and lead to peeling. When these steps are diligently followed, the question of how to apply epoxy on floor tiles becomes a straightforward task, turning your space into a resilient and gleaming surface.
Mixing the Epoxy Properly
Getting epoxy to adhere perfectly to your floor tiles requires more than just mixing the right ingredients. It’s a process that demands precision and patience. Proper mixing of epoxy is crucial to ensure a smooth, durable finish that lasts for years. When you understand how to mix epoxy properly, the application becomes less of a chore and more of an art. This step guarantees the epoxy’s consistency, prevents air bubbles, and ensures even coverage.
Start by carefully measuring the resin and hardener in the exact proportions specified by the manufacturer. Use a clean, dry container and a stir stick to blend them thoroughly. It’s important to mix slowly and steadily, scraping the sides and bottom of the container to incorporate all components. This method helps avoid unmixed patches that could compromise the epoxy’s strength.
Once mixed, the epoxy should be used within the working time specified—usually around 30-45 minutes. For an optimal finish, some professionals recommend adding a small amount of thinners or fillers, depending on the type of epoxy you are using. Remember, the success of floor tiles me epoxy kaise lagaye lies heavily on your mixture’s consistency and readiness. Proper mixing is the foundation for a flawless, resilient surface that withstands the test of time and traffic!
Applying Epoxy Primer (if necessary)
Applying epoxy on floor tiles may sound like a straightforward task, but trust me, it’s an art form that can make or break your flooring masterpiece. Before diving into the process, consider whether you need to apply an epoxy primer—especially if your tiles are porous or have uneven surfaces. This step acts as a superhero shield, ensuring the epoxy sticks like a limpet to the surface and doesn’t peel off after a few months of foot traffic.
Start by cleaning the tiles thoroughly, removing any grease, dust, or residues. If necessary, lightly sand the surface to improve adhesion. Once the surface is prepped, apply a high-quality epoxy primer using a roller or brush, making sure to cover every nook and cranny. This primer not only boosts bonding strength but also helps achieve that smooth, glossy finish everyone desires in floor tiles me epoxy kaise lagaye. After the primer has dried completely—usually a few hours—you’re ready for the main event: pouring and spreading the epoxy mixture evenly across the surface. Remember, patience is key; rushing can lead to uneven coverage and a less durable finish. With proper surface preparation and priming, your epoxy application will stand the test of time, traffic, and the occasional spill!
Applying the First Coat of Epoxy
Once your surface is perfectly prepped and primed, the next crucial step in the process of floor tiles me epoxy kaise lagaye is applying the first coat of epoxy. This stage sets the foundation for a durable, smooth finish that can withstand daily wear and tear. It’s important to work methodically, ensuring the epoxy is spread evenly across the entire surface. Using a roller or brush, start from one corner and gently work your way across, maintaining a consistent pressure. This prevents streaks and uneven patches that could mar your flooring’s appearance.
During this phase, pay attention to the epoxy’s thickness; too thick could cause drips, while too thin might not offer sufficient coverage. For larger areas, an epoxy squeegee can be a helpful tool to distribute the mixture uniformly. Remember, patience is key—allow each section to settle before moving on to the next. The goal is a seamless layer that will bond tightly with the surface, ensuring your effort in floor tiles me epoxy kaise lagaye results in a resilient finish that lasts for years to come.
Using Proper Techniques for Even Coverage
In the shadowed corridors of renovation, few tasks hold as much silent promise as the application of epoxy on floor tiles. The process of *floor tiles me epoxy kaise lagaye* is an art, a dance between precision and patience, where every stroke reveals a new layer of resilience. When executed with finesse, this technique transforms a mundane surface into a fortress of durability, capable of withstanding the relentless march of time and wear.
The key lies in the methodical spread of the epoxy, ensuring an even coat that whispers of craftsmanship. Using a roller or brush, begin from one corner—like a painter starting his masterpiece—and work methodically across the surface. An unhurried, deliberate motion prevents streaks and patches that could mar the final appearance. For expansive areas, an epoxy squeegee becomes an invaluable ally, helping to distribute the mixture evenly and eliminate air pockets that could haunt the finish later.
Remember, patience is your most trusted companion. Allow each section to settle, breathe, and bond before advancing. The goal is an unbroken, seamless layer—an armour forged in layers, whispering tales of resilience for years to come. In the realm of *floor tiles me epoxy kaise lagaye*, mastery is achieved when every inch bears the mark of deliberate craft, ensuring your surface’s durability is etched in every smooth, glossy line.
Allowing Adequate Curing Time
Epoxy flooring is transforming spaces worldwide, with many realising its potential to turn ordinary surfaces into extraordinary showcases of durability and style. When it comes to *floor tiles me epoxy kaise lagaye*, patience and precision are essential. The curing process plays a pivotal role in ensuring the epoxy bonds seamlessly, creating a resilient shield that withstands the test of time. Proper curing not only enhances the finish but also fortifies the surface against scratches, stains, and wear.
To achieve flawless results, allow the epoxy to set undisturbed for at least 24 to 48 hours—sometimes longer, depending on ambient conditions. During this period, avoid any foot traffic or exposure to moisture, as premature disturbance can cause imperfections or bubbles. The curing time is a small sacrifice for a finish that gleams with strength and longevity, making your investment worthwhile. When *floor tiles me epoxy kaise lagaye* is executed with patience, the final outcome is a seamless, glossy surface that offers both aesthetic appeal and enduring resilience.
Applying Additional Coats for Durability
Once the initial epoxy layer has set perfectly, the journey toward a truly durable and gleaming surface continues with applying additional coats. This step is where patience truly pays off, as multiple layers of epoxy reinforce the surface’s resilience and enhance its aesthetic appeal. When considering *floor tiles me epoxy kaise lagaye*, layering is a crucial phase that transforms a good finish into an extraordinary one.
To ensure maximum durability, apply the second coat once the first coat has fully cured and dried. This typically involves lightly sanding the surface to create a rough texture, helping the new layer adhere better. Using a roller or brush, spread the epoxy evenly, maintaining a consistent thickness. For added strength, some professionals recommend applying a third or even fourth coat, especially in high-traffic areas.
- Make sure each layer is fully cured before applying the next
This process creates a seamless, glossy finish that resists wear, stains, and scratches, making your floors a statement of resilience and style.
Remember, applying additional coats isn’t just about aesthetics — it’s a strategic move to bolster the surface’s durability. When *floor tiles me epoxy kaise lagaye* is executed with meticulous attention to detail, the final result will be a resilient, beautiful surface that stands the test of time and enhances the overall elegance of your space.
Tips for a Successful Epoxy Floor Installation
Best Weather Conditions for Application
When it comes to epoxy flooring, the weather can make or break your masterpiece. Think of it as trying to paint a portrait in a tornado—chaos ensues! The best weather conditions for application are those with stable temperatures, ideally between 10°C and 30°C, with low humidity levels. High humidity or sudden temperature fluctuations can cause bubbles or improper curing, turning your sleek floor into a sticky mess. Remember, patience is a virtue, especially when waiting for the right weather window.
For a flawless finish, avoid rainy days or overly humid mornings. Clear skies and moderate temperatures create an ideal environment for floor tiles me epoxy kaise lagaye to shine. If you’re unsure about the weather forecast, consider using a temporary shelter or waiting for a more stable climate. This strategic timing ensures your epoxy adheres perfectly, resulting in a durable, glossy surface that turns heads — not complaints!
Avoiding Common Mistakes
Embarking on the journey to transform your space with epoxy flooring is akin to a profound act of creation—an act that demands patience, precision, and a keen understanding of subtle nuances. One of the most overlooked yet critical phases in this process is avoiding common mistakes during epoxy application. The difference between a glossy, durable surface and a sticky, uneven mess often hinges on small details that many overlook. For instance, rushing through surface preparation or neglecting proper mixing can sabotage your efforts before they even begin.
To ensure a successful epoxy installation, consider these vital tips. First, always double-check the surface’s dryness and cleanliness; moisture or dust can mar the adhesion quality. Second, be mindful of environmental factors—temperature and humidity can subtly influence the curing process. If you want your floor tiles me epoxy kaise lagaye to result in a flawless finish, patience is paramount. Waiting for the right weather window and using the correct materials can make a significant difference.
Additionally, avoid common pitfalls like applying epoxy in a hurried manner or neglecting to use the proper tools. A meticulous approach, combined with strategic planning, enhances the durability and aesthetic appeal of your floor. Remember, each step in the process is a reflection of your dedication—skipping essential details can lead to costly rework and disappointment. When done correctly, epoxy flooring not only elevates the visual appeal but also extends the longevity of your floor tiles, turning your vision into a resilient reality.
Ensuring Proper Ventilation
Proper ventilation during epoxy floor installation is like giving your space a breath of fresh air, ensuring the curing process unfolds smoothly. Without adequate airflow, fumes can accumulate, which not only hampers the epoxy’s adhesion but also poses health risks. A well-ventilated environment accelerates curing and prevents a sticky or uneven finish, making your effort worthwhile. When undertaking floor tiles me epoxy kaise lagaye, remember that air circulation is a silent partner in achieving a flawless surface.
To optimise the process, open windows and doors, and consider using exhaust fans to circulate air efficiently. If working indoors, creating cross-ventilation by strategically placing fans can make a significant difference. Avoid working in confined, poorly ventilated spaces—this is where small details can become pivotal in your epoxy journey. Ensuring proper ventilation not only safeguards your health but also enhances the durability and aesthetic of your epoxy flooring, transforming your space into a masterpiece of resilience and beauty.
Maintaining a Dust-Free Environment During Curing
Maintaining a dust-free environment during the curing process of epoxy flooring is paramount to achieving that flawless, mirror-like finish. Dust particles, seemingly insignificant, can settle into the curing epoxy, marring its smooth surface and compromising durability. As the epoxy hardens, even the tiniest speck of debris can become a stubborn blemish, disrupting your carefully crafted masterpiece. Therefore, creating a pristine, uncontaminated zone is not merely advisable; it is essential.
To accomplish this, it is wise to establish a controlled environment. Cover nearby objects with plastic sheeting, and keep air vents sealed to prevent dust infiltration. Consider implementing a gentle filtration system or HEPA filters to maintain a clean atmosphere. For optimal results, ensure that the space remains undisturbed during the critical curing phase, which can take several hours to days depending on the epoxy type used.
When working on floor tiles me epoxy kaise lagaye, remember that even the most meticulous surface preparation can be rendered futile if dust contamination occurs mid-process. A clean, dust-free environment guarantees that your epoxy coating will adhere perfectly and cure to a resilient, glossy finish. This attention to detail transforms a routine task into an art form, embodying craftsmanship and precision. After all, in the realm of epoxy flooring, purity of environment is the silent guardian of excellence.
Post-Application Care and Maintenance
Cleaning and Maintaining Epoxy Coated Tiles
Once the enchanting process of applying epoxy on your floor tiles is complete, the journey towards enduring beauty and resilience begins with post-application care. Proper maintenance ensures that the glossy finish remains unmarred and the surface retains its splendour for years to come. Regular cleaning helps preserve the seamless appeal of epoxy-coated tiles, preventing the accumulation of dust, dirt, and stains that can dull their luster. A gentle sweep followed by mopping with a mild, non-abrasive cleanser is often enough to maintain their pristine condition, but avoid harsh chemicals that might compromise the epoxy’s integrity.
For optimal longevity, it’s wise to implement a routine of periodic inspection. Look for any signs of wear or damage, such as small chips or cracks, which could compromise the surface’s durability. Addressing these issues promptly can prevent further deterioration. When considering how to keep your epoxy floors in top shape, remember that diligent care is key—this includes avoiding abrasive scrubbers and harsh cleaning agents. Embracing these practices ensures that your floor tiles me epoxy kaise lagaye project remains a testament to craftsmanship and careful stewardship, transforming your space into a magnificent realm of elegance and strength.
Handling Repairs and Touch-ups
Once your epoxy coating has been meticulously applied to your floor tiles me epoxy kaise lagaye, the journey of preservation begins. Proper post-application care is vital to maintain that radiant, seamless finish. Regular cleaning not only preserves the glossy allure but also prevents dust and dirt from settling into the surface, which can dull its stunning appearance. Using a soft mop and a mild, non-abrasive cleaner is ideal—harsh chemicals might compromise the epoxy’s durability.
Handling repairs and touch-ups with finesse can extend the life of your epoxy flooring significantly. When you notice small chips or cracks, addressing them promptly is essential. This can be achieved through a simple process:
- Clean the affected area thoroughly to remove any debris.
- Apply a compatible epoxy patch or filler, ensuring even blending with the existing surface.
- Allow sufficient curing time before walking on the repaired spot.
Maintaining the beauty of your epoxy-coated floor tiles me epoxy kaise lagaye project requires vigilant inspection and gentle handling. By avoiding abrasive scrubbers and ensuring timely repairs, you safeguard your investment, transforming your space into a showcase of resilience and elegance that endures the test of time and traffic.
Periodic Inspection for Longevity
After successfully applying epoxy to your floor tiles me epoxy kaise lagaye, the journey to long-lasting beauty begins with diligent post-application care. Regular inspection is essential; it helps catch minor damages early before they escalate into costly repairs. Periodic checks of the coated surface ensure that any cracks or chips are identified promptly, maintaining the integrity of your epoxy flooring. This proactive approach not only prolongs its lifespan but also preserves its glossy appearance and seamless finish.
Maintaining a pristine surface involves gentle cleaning routines. Use a soft mop and a mild, non-abrasive cleaner to remove dirt and dust—harsh chemicals can weaken the epoxy’s protective layer. For surfaces that have sustained minor damage, quick touch-ups are crucial. Applying a compatible epoxy patch after cleaning the affected area and allowing sufficient curing time can prevent further deterioration. This simple maintenance process keeps your epoxy floor looking its best for years to come, ensuring your investment in floor tiles me epoxy kaise lagaye remains worthwhile.

0 Comments